






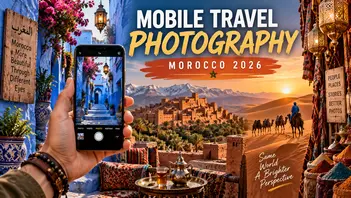
What if the best travel camera for your next trip is already in your pocket?
You do not need an expensive camera body or a heavy bag of lenses to come home with photographs that actually capture the feeling of a place. A modern smartphone can handle mountain landscapes, busy markets, architecture, food, portraits, wildlife, sunsets, and fast moving street scenes surprisingly well.
The real difference between an ordinary snapshot and a photograph you want to keep is rarely the number of megapixels.
It is knowing how to use light, timing, composition, perspective, focus, and exposure to turn what you see into a stronger image.
These Travel Photography Tips will show you how to Take Better Mobile Photos without turning your trip into a complicated photography lesson. You will learn how to work with your phone instead of relying entirely on automatic mode, how to find better angles, how to photograph difficult light, and how to edit your images without losing the atmosphere that made the moment special.
If photographing people, markets, medinas, and everyday life is a major part of your trip, continue with our Ultimate Street Photography in Morocco guide for practical advice on composition, etiquette, and photographing authentic moments respectfully.
And if Morocco is your main destination, our Perfecting Your Travel Photography in Morocco 2026 guide goes deeper into the landscapes, light, architecture, colors, and photographic opportunities that make the country so distinctive.
The goal here is simple: “Spend less time fighting your camera and more time noticing the moments worth photographing.”
Travel Photography Tips at a Glance
If you only remember a few things from this guide, start here.
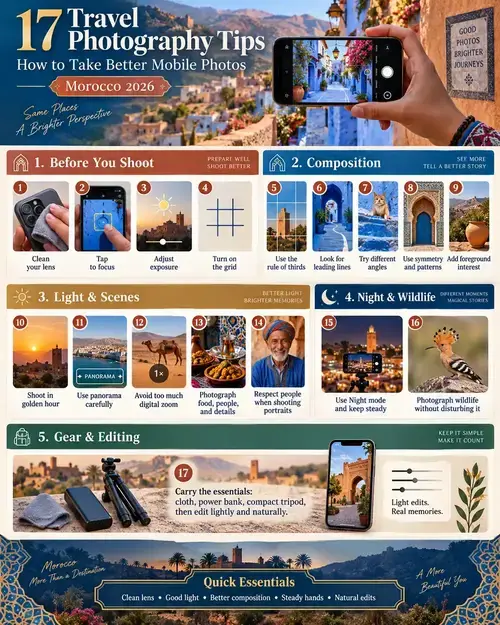
1. Clean Your Camera Lens Before You Start
It sounds almost too simple to matter.
It matters a lot.
Your phone spends its day in pockets, bags, hands, cafés, taxis, beaches, and airports. Fingerprints and dust quickly collect on the camera glass.
The result can be soft photographs, strange glare around lights, reduced contrast, and images that look slightly hazy.
Before photographing an important scene, give the lens a quick wipe with a clean microfiber cloth.
It takes a few seconds and can improve the image more than changing several camera settings.
This is especially important before photographing sunsets, night scenes, bright windows, or strong artificial lights.
2. Learn to Control Focus and Exposure
Your phone is very good at deciding what it thinks you want to photograph.
It is not always right.
When the scene contains both bright and dark areas, automatic exposure may brighten the shadows too much or completely wash out the sky.
Start by tapping the most important subject on your screen.
On many phones, you can then adjust the exposure using the brightness control that appears beside the focus point.
If your phone allows focus and exposure locking, use it when your composition is unlikely to change.
This is particularly useful when photographing:
- Sunsets
- People standing against bright backgrounds
- Street scenes
- Architecture
- Food beside windows
- Silhouettes
A small exposure adjustment can often create a better photograph than applying a heavy filter later.
Useful Smartphone Camera Settings
| Setting | Main Benefit | Best Use |
|---|---|---|
| Focus control | Keeps your subject sharp | Portraits, food and details |
| Exposure control | Prevents images becoming too bright or dark | High contrast scenes |
| Grid | Helps composition and straight horizons | Landscapes and architecture |
| Night mode | Improves photographs in limited light | Streets, cities and interiors |
| Burst or continuous capture | Records several moments quickly | Action and wildlife |
| RAW capture, when available | Provides greater editing flexibility | Difficult light and serious editing |
You do not need to use every setting every time.
The best camera setup is usually the simplest one that solves the problem in front of you.
3. Turn On the Camera Grid
One of the easiest improvements you can make to your travel photography is turning on the grid.
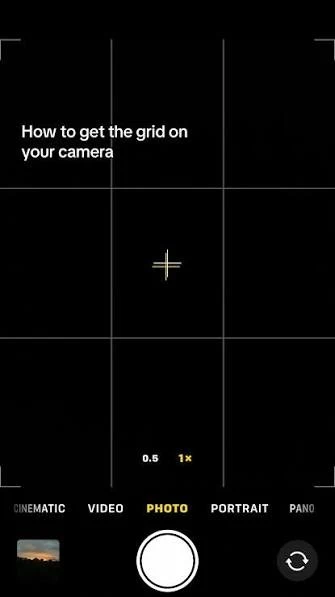
Most camera apps can display a three by three grid over the preview.
The lines do not appear in the final photograph.
They simply help you compose.
Use them to keep horizons straight, position important subjects more intentionally, and avoid automatically placing everything in the middle of the frame.
Try the Rule of Thirds:
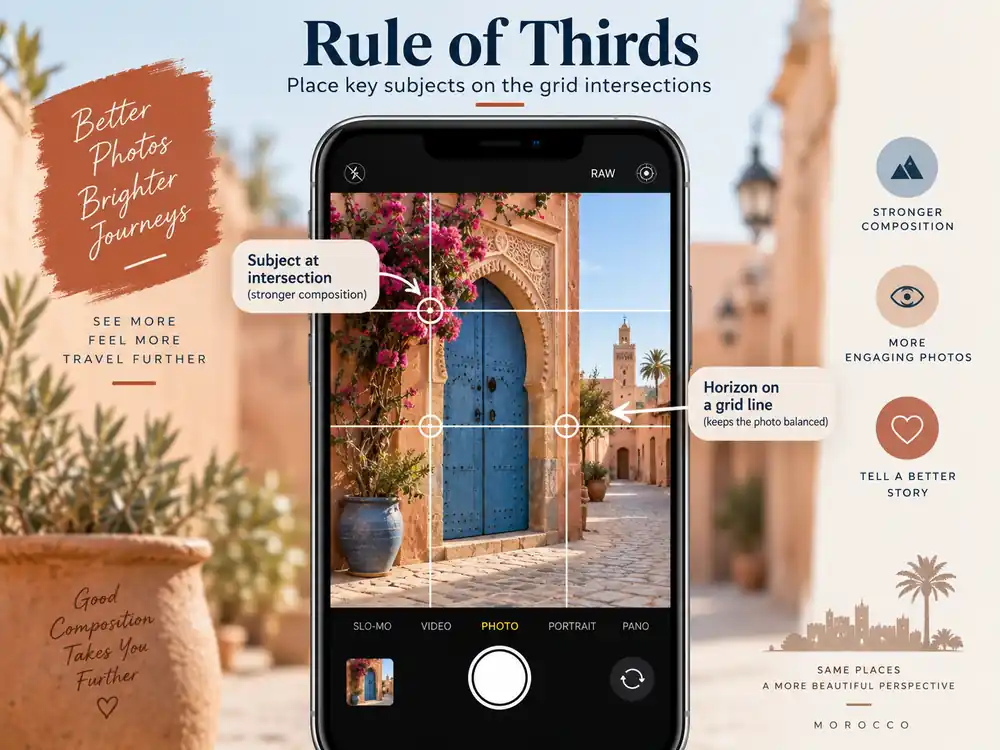
Imagine your frame divided into nine equal sections.
Instead of placing your subject directly in the center, position it near one of the intersections.
For a landscape, try placing the horizon along the upper or lower horizontal line.
For a portrait, position the person slightly to one side and leave some space in the direction they are looking.
The rule of thirds is not a law.
It is simply an easy starting point when a composition feels awkward.
4. Use Leading Lines to Give Your Photos Depth
Some scenes naturally pull your eyes toward a destination.
A road disappearing through mountains, a narrow medina alley, a bridge, railway tracks, a coastline, stairs, shadows, or even a row of market stalls can guide the viewer deeper into the image.
These are called leading lines.
Instead of photographing them randomly, think about where they begin inside your frame and where they lead.
A line beginning near the bottom corner and moving toward your subject can make an ordinary scene feel much more immersive.
Look for Leading Lines in:
- Roads
- Footpaths
- Bridges
- Staircases
- Building edges
- Rivers
- Shorelines
- Rows of trees
- Market aisles
- Shadows
Travel destinations are full of natural lines once you start noticing them.
5. Stop Photographing Everything at Eye Level
Most phone photographs are taken from the same height because that is where we naturally hold the device.
Changing your position can completely change the photograph.
Get lower.
Move to one side.
Shoot through a doorway.
Photograph from a staircase.
Step farther back.
Use reflections.
Move closer to an interesting detail.
A crowded tourist attraction can become much more interesting simply by changing where you stand.
Before pressing the shutter, ask yourself:
Is there a more interesting place from which I could photograph this?
Sometimes moving two metres makes more difference than buying new equipment.
6. Use Symmetry and Patterns in Architecture

Architecture offers endless opportunities for smartphone photography.
Doors, windows, arches, columns, tiles, courtyards, balconies, staircases, and repeating decorations can all become strong compositions.
When photographing a symmetrical structure, move until you are genuinely centered.
Check that vertical and horizontal lines are straight.
Then simplify the frame.
The fewer distractions surrounding a strong pattern, the more powerful the photograph usually becomes.
| Composition Technique | What It Does | Ideal Subjects |
|---|---|---|
| Rule of thirds | Creates natural visual balance | Landscapes and portraits |
| Leading lines | Pulls the eye through the image | Roads, alleys and bridges |
| Symmetry | Creates order and visual impact | Buildings and interiors |
| Natural framing | Directs attention toward the subject | Doors, arches and windows |
| Foreground interest | Adds depth | Mountains and coastlines |
| Patterns | Creates rhythm and texture | Tiles, markets and architecture |
7. Learn to Recognize Good Travel Photography Light
Light can transform the same location from ordinary to unforgettable.
You do not always need perfect weather.
You need to understand what the available light is doing.
Golden Hour
The period shortly after sunrise and before sunset often creates softer, warmer light.
It works particularly well for:
- Mountains
- Beaches
- Architecture
- Deserts
- Portraits
- City skylines
Longer shadows also reveal texture and depth.
Blue Hour
Just before sunrise and shortly after sunset, the sky can develop cooler blue tones while city lights begin to appear.
This is an excellent time for cityscapes, waterfronts, monuments, and illuminated streets.
Midday Light
Strong midday sun is more difficult, but it is not useless.
Rather than forcing a soft landscape photograph, use the strong contrast creatively.
Look for:
- Shadows
- Geometric architecture
- Colorful walls
- Markets
- Narrow streets
- Reflections
Photography improves when you start adapting to the light instead of waiting for perfect conditions.
8. Add Foreground Interest to Landscape Photos
A beautiful view does not automatically become a beautiful photograph.
One reason landscapes often look less impressive on a phone than they did in person is the loss of depth.
The camera compresses everything into a flat frame.
Foreground elements help restore that feeling of distance.
Instead of photographing only the mountains, include something closer to you.
It could be:
- Rocks
- Flowers
- Sand
- A trail
- A fence
- A person
- A boat
- A tree
- Local architecture
The viewer now has something close, something in the middle distance, and something far away.
The scene immediately feels larger.
9. Use Panorama Mode Carefully
Panorama mode can be useful when a landscape is simply too wide for one frame.
Mountain ranges, coastlines, valleys, skylines, and large viewpoints are obvious examples.
Move the phone slowly and smoothly while keeping it as level as possible.
Avoid rushing.
Also pay attention to moving people or vehicles. Because a panorama is created while the camera moves across the scene, motion can sometimes produce strange distortions.
Do not use panorama mode simply because a landscape is large.
A carefully composed standard photograph can often feel stronger than trying to include everything.
10. Avoid Relying on Digital Zoom
Zoom is one of the easiest ways to lose image quality.
Many phones now offer several physical camera lenses, while additional zoom levels may rely partly or entirely on cropping and software processing.
When possible, use the phone’s actual optical lens options.
If the image starts looking noticeably soft or artificial, step back from the zoom.
For a distant subject, you generally have three better choices:
- Move closer when it is safe and appropriate.
- Use the phone’s dedicated telephoto camera if available.
- Take a wider photograph and crop carefully later.
This matters especially for wildlife, architecture, distant mountains, and stage photography.
11. Photograph People With Respect
People can bring a destination to life in a way that buildings and landscapes cannot.
A baker preparing bread, a fisherman repairing a net, an artisan working in a small workshop, or friends sharing tea can communicate more about a place than another photograph of its main monument.
But the photograph should never be more important than the person.
When someone is clearly identifiable and you are photographing them directly, ask when appropriate.
A smile, a greeting, or a short conversation can completely change the interaction.
You may also end up with a more natural portrait because the person understands why you are photographing them.
When photographing children, religious moments, private spaces, or culturally sensitive situations, be especially careful and respectful.
Not every interesting moment needs to become content.
12. Photograph Food as Part of the Story
Food photographs become much more interesting when they show context.
Instead of photographing only a plate, look at what is happening around it.
Capture steam rising from a grill.
Photograph hands preparing bread.
Include spices, cookware, market stalls, café tables, or the street behind the meal.
Try photographing:
- Ingredients
- Preparation
- The finished dish
- The person making it
- The surrounding environment
Together, those photographs tell a story.
When working with food indoors, window light is often more attractive than direct overhead lighting.
13. Look for Small Details
Not every travel photograph needs to show an entire destination.
Sometimes the details carry more personality.
Look closer at:
- Old doorways
- Tile patterns
- Hand painted signs
- Weathered walls
- Local crafts
- Textiles
- Market produce
- Street art
- Traditional tools
- Architectural carvings
Combine wide photographs with medium scenes and close details.
That variation makes a collection of travel photographs feel much richer.
A Simple Travel Photo Story
When exploring a destination, try capturing these five types of image:
| Shot Type | Purpose |
|---|---|
| Wide establishing shot | Shows where you are |
| Medium environmental shot | Shows people or activity within the destination |
| Close detail | Reveals texture and character |
| Portrait | Adds human connection |
| Unexpected moment | Gives the story personality |
You now have a visual sequence rather than twenty versions of the same landmark.
14. Photograph Wildlife Without Disturbing It
Wildlife photography requires patience.
The priority should always be the animal, not the photograph.
Keep an appropriate distance and avoid chasing wildlife simply to get closer.
Watch how the animal behaves.
If your presence is clearly changing its behavior, you are probably too close.
For moving subjects, continuous shooting or burst capture can improve your chances of catching a sharp moment.
Take several frames, then keep only the strongest one.
Avoid depending heavily on digital zoom. Excessive enlargement can quickly destroy fine detail.
Wildlife photographs are often better when you include some of the environment rather than filling the entire frame with the animal.
That context shows where the encounter happened and can produce a stronger travel image.
15. Use Night Mode Without Making Night Look Like Day
Modern phones can produce impressive photographs after sunset.
Night mode works best when you give it what it needs most:
stability.
Hold the phone with both hands and keep it still while the exposure is being captured.
For more demanding scenes, use a small tripod or place the phone securely on a stable surface.
Better Low Light Photography
| Situation | Best Approach |
|---|---|
| City streets | Use available shop and street lighting |
| Architecture at night | Keep the phone stable and protect bright highlights |
| Restaurants | Look for soft available light rather than direct flash |
| Night landscapes | Use a tripod or stable surface |
| Moving people | Accept some motion or seek stronger available light |
| Neon scenes | Reduce exposure slightly to preserve color |
Avoid automatically using the phone’s flash.
Direct flash often removes the atmosphere that made the scene interesting in the first place.
Street lamps, shop windows, candles, signs, and other available light sources can create a far more natural result.
16. Carry Only the Travel Photography Gear You Actually Need
One advantage of smartphone photography is freedom.
Do not recreate the weight of a full camera bag by filling your backpack with accessories you rarely use.
A small kit is usually enough.
Useful Smartphone Travel Photography Gear
| Item | Why It Helps | Priority |
|---|---|---|
| Microfiber cloth | Keeps camera lenses clean | Essential |
| Power bank | Keeps your phone available through long travel days | Essential |
| Charging cable | Prevents avoidable battery problems | Essential |
| Compact tripod | Improves night shots, group photos and video | Useful |
| Small phone grip | Adds stability | Optional |
| External lens | Adds creative options on compatible phones | Optional |
| Cloud backup | Protects photographs if the phone is lost | Highly useful |
Before buying an accessory, ask whether your phone already does the job well enough.
The best travel photography kit is the one you are willing to carry every day.
17. Edit Your Photos Without Destroying the Atmosphere
Editing should improve what was already there.
It should not make every destination look like the same preset.
Start with basic corrections.
Adjust exposure.
Recover bright highlights when possible.
Open dark shadows carefully.
Correct the white balance.
Add a small amount of contrast.
Straighten the horizon.
Crop distracting edges.
Then stop and look at the image again.
The most common editing mistake is continuing long after the photograph already looked good.
Lightroom Mobile
Lightroom Mobile provides detailed control over exposure, highlights, shadows, color, curves, and selective adjustments.
It is particularly useful if you want consistency across a larger travel photo collection.
Snapseed
Snapseed remains useful for quick edits and selective adjustments.
You can work on specific areas without dramatically changing the entire photograph.
Whatever app you use, the principle stays the same.
Try to recreate the atmosphere you experienced rather than forcing every image into an exaggerated style.
How to Organize and Back Up Travel Photos
Travel photography does not end when you press the shutter.
A simple workflow can protect your images and save hours later.
Back Up Important Photos
Whenever possible, enable automatic cloud backup.
This provides an additional copy if your phone is lost, damaged, or stolen.
Do not wait until the end of a long trip to think about backups.
Delete Carefully
You do not need twenty almost identical versions of every scene.
During a quiet moment, remove obvious mistakes and accidental shots.
Be more careful with photographs that simply feel different from what you expected.
Sometimes an imperfect frame becomes more meaningful later.
Organize by Destination and Date
A simple structure works better than an elaborate system you will never maintain.
For example:
2026 > Morocco > Chefchaouen
or
2026 > Thailand > Bangkok
Consistency matters more than complexity.
Common Smartphone Travel Photography Mistakes
Improving your photography often means eliminating simple mistakes rather than learning complicated techniques.
| Common Mistake | What Happens | Better Approach |
|---|---|---|
| Dirty lens | Photos look hazy | Clean the lens regularly |
| Crooked horizon | Landscape feels careless | Use the grid |
| Too much digital zoom | Fine detail disappears | Use an optical lens or crop later |
| Overediting | Colors look artificial | Make smaller adjustments |
| Always centering the subject | Composition becomes repetitive | Try thirds, symmetry and negative space |
| Ignoring backgrounds | Distracting objects ruin strong subjects | Check the entire frame |
| Photographing only landmarks | Travel gallery lacks personality | Include people, food and details |
| Taking only one frame | You may miss the strongest moment | Take a few deliberate variations |
How to Develop Your Own Travel Photography Style
Photography becomes more interesting when you stop trying to make every image look like someone else’s.
Pay attention to what naturally attracts you.
Maybe you constantly notice architecture.
Perhaps you photograph markets.
Maybe you prefer quiet landscapes, strong shadows, people, old doors, beaches, minimal compositions, or busy streets.
Those repeated interests gradually become your visual style.
Change Your Perspective
Return to the same subject from several positions.
Try a low angle.
Move farther away.
Use reflections.
Photograph through an arch or doorway.
Include more empty space.
Wait for a person to enter the frame.
Small experiments teach you much more than constantly changing equipment.
Keep Your Editing Consistent
Consistency does not mean applying the same filter to every photograph.
It means developing preferences.
You might favor warmer colors, restrained saturation, softer contrast, deeper shadows, or bright natural tones.
Over time, those choices make a collection feel connected.
A Simple Travel Photography Routine
When you arrive somewhere new, resist the temptation to photograph immediately.
Spend a few minutes observing.
Then follow this simple process:
- Clean your lens.
- Look at where the light is coming from.
- Take one wide photograph of the overall scene.
- Find an interesting foreground or frame.
- Photograph one human moment when appropriate.
- Look for details and textures.
- Change your position.
- Try one unexpected composition.
- Review the most important images before leaving.
- Back up your favorites when you have a reliable connection.
This approach slows you down just enough to start seeing rather than simply recording.
Final Thoughts
Better Smartphone Travel Photography does not begin with buying a better camera.
It begins with paying closer attention.
Notice where the light falls.
Look at what is happening behind your subject.
Move before you zoom.
Wait a few seconds for the right person to enter the frame.
Photograph the details that everyone else walks past.
Your smartphone already removes much of the technical difficulty that once came with photography.
Use that freedom to focus on something more important:
the story of the place in front of you.
The more you practice, the more naturally you will start recognizing good light, stronger compositions, interesting details, and moments worth remembering.
And when that happens, your travel photographs stop feeling like a collection of snapshots.
They start feeling like the journey itself.
Frequently Asked Questions
What are the most important travel photography tips for beginners?
Start with light, composition, focus, and timing. Clean your camera lens, turn on the grid, tap your subject to focus, adjust the exposure when necessary, and pay attention to the entire frame before taking the photograph.
Can a smartphone take good travel photos?
Yes. Modern smartphones are capable of excellent travel photography, particularly when the photographer understands lighting, composition, exposure, and the limits of digital zoom.
What are the best smartphone camera settings for travel photography?
For most situations, automatic mode works well. Turn on the grid, learn how to control focus and exposure, use Night mode in low light, and use RAW capture selectively if your device supports it and you intend to edit the photograph carefully.
What is the best time of day for travel photography?
Sunrise and the period before sunset often provide soft, warm light that works especially well for landscapes and architecture. Blue hour can be excellent for cities. Midday light can still work well when you use shadows, patterns, and strong colors creatively.
How can I make smartphone landscape photos look better?
Include foreground interest, keep the horizon straight, photograph in interesting light, and use leading lines to create depth. Avoid trying to include everything simply because the landscape is large.
Should I use digital zoom when taking travel photos?
Use it sparingly. Excessive digital zoom can reduce detail and image quality. When possible, use your phone’s dedicated optical camera, move closer when appropriate, or take a wider photograph and crop later.
How do I take better travel photos at night?
Keep the phone as steady as possible, use Night mode when appropriate, avoid unnecessary flash, and look for existing light from buildings, street lamps, signs, or windows. A compact tripod can help with scenes that require longer exposures.
What photography gear should I carry when traveling with a phone?
A microfiber cloth, charging cable, and power bank cover the essentials. A compact tripod can be useful for night photography, videos, and self portraits. Additional lenses and other accessories are optional.
What are the best apps for editing travel photos?
Adobe Lightroom Mobile is useful for more detailed adjustments and consistent color work. Snapseed is useful for quick edits and selective corrections. The best app is ultimately the one that lets you improve the photograph without making the result look unnatural.
How can I take respectful portraits while traveling?
Interact with people as people first and photographic subjects second. Ask when appropriate, respect anyone who does not want to be photographed, and be particularly cautious around children, religious settings, private spaces, and sensitive situations.
How do I make my travel photos look consistent?
Develop preferences in composition, subjects, lighting, and editing rather than applying extreme presets. A consistent style develops naturally when you repeatedly photograph what genuinely interests you.
How many photos should I take while traveling?
There is no ideal number. Take enough variations to give yourself a choice, but avoid recording hundreds of nearly identical frames. A smaller collection of intentional photographs is usually more meaningful than a huge collection of repetitive images.